- Your cart is empty
- Continue Shopping
Nano Banana 2 से AI Photo कैसे बनाएं? Face बिना बदले 10 Best Prompts
- Blog
- Posted on
-
by GraphicsMart
- 0 comments
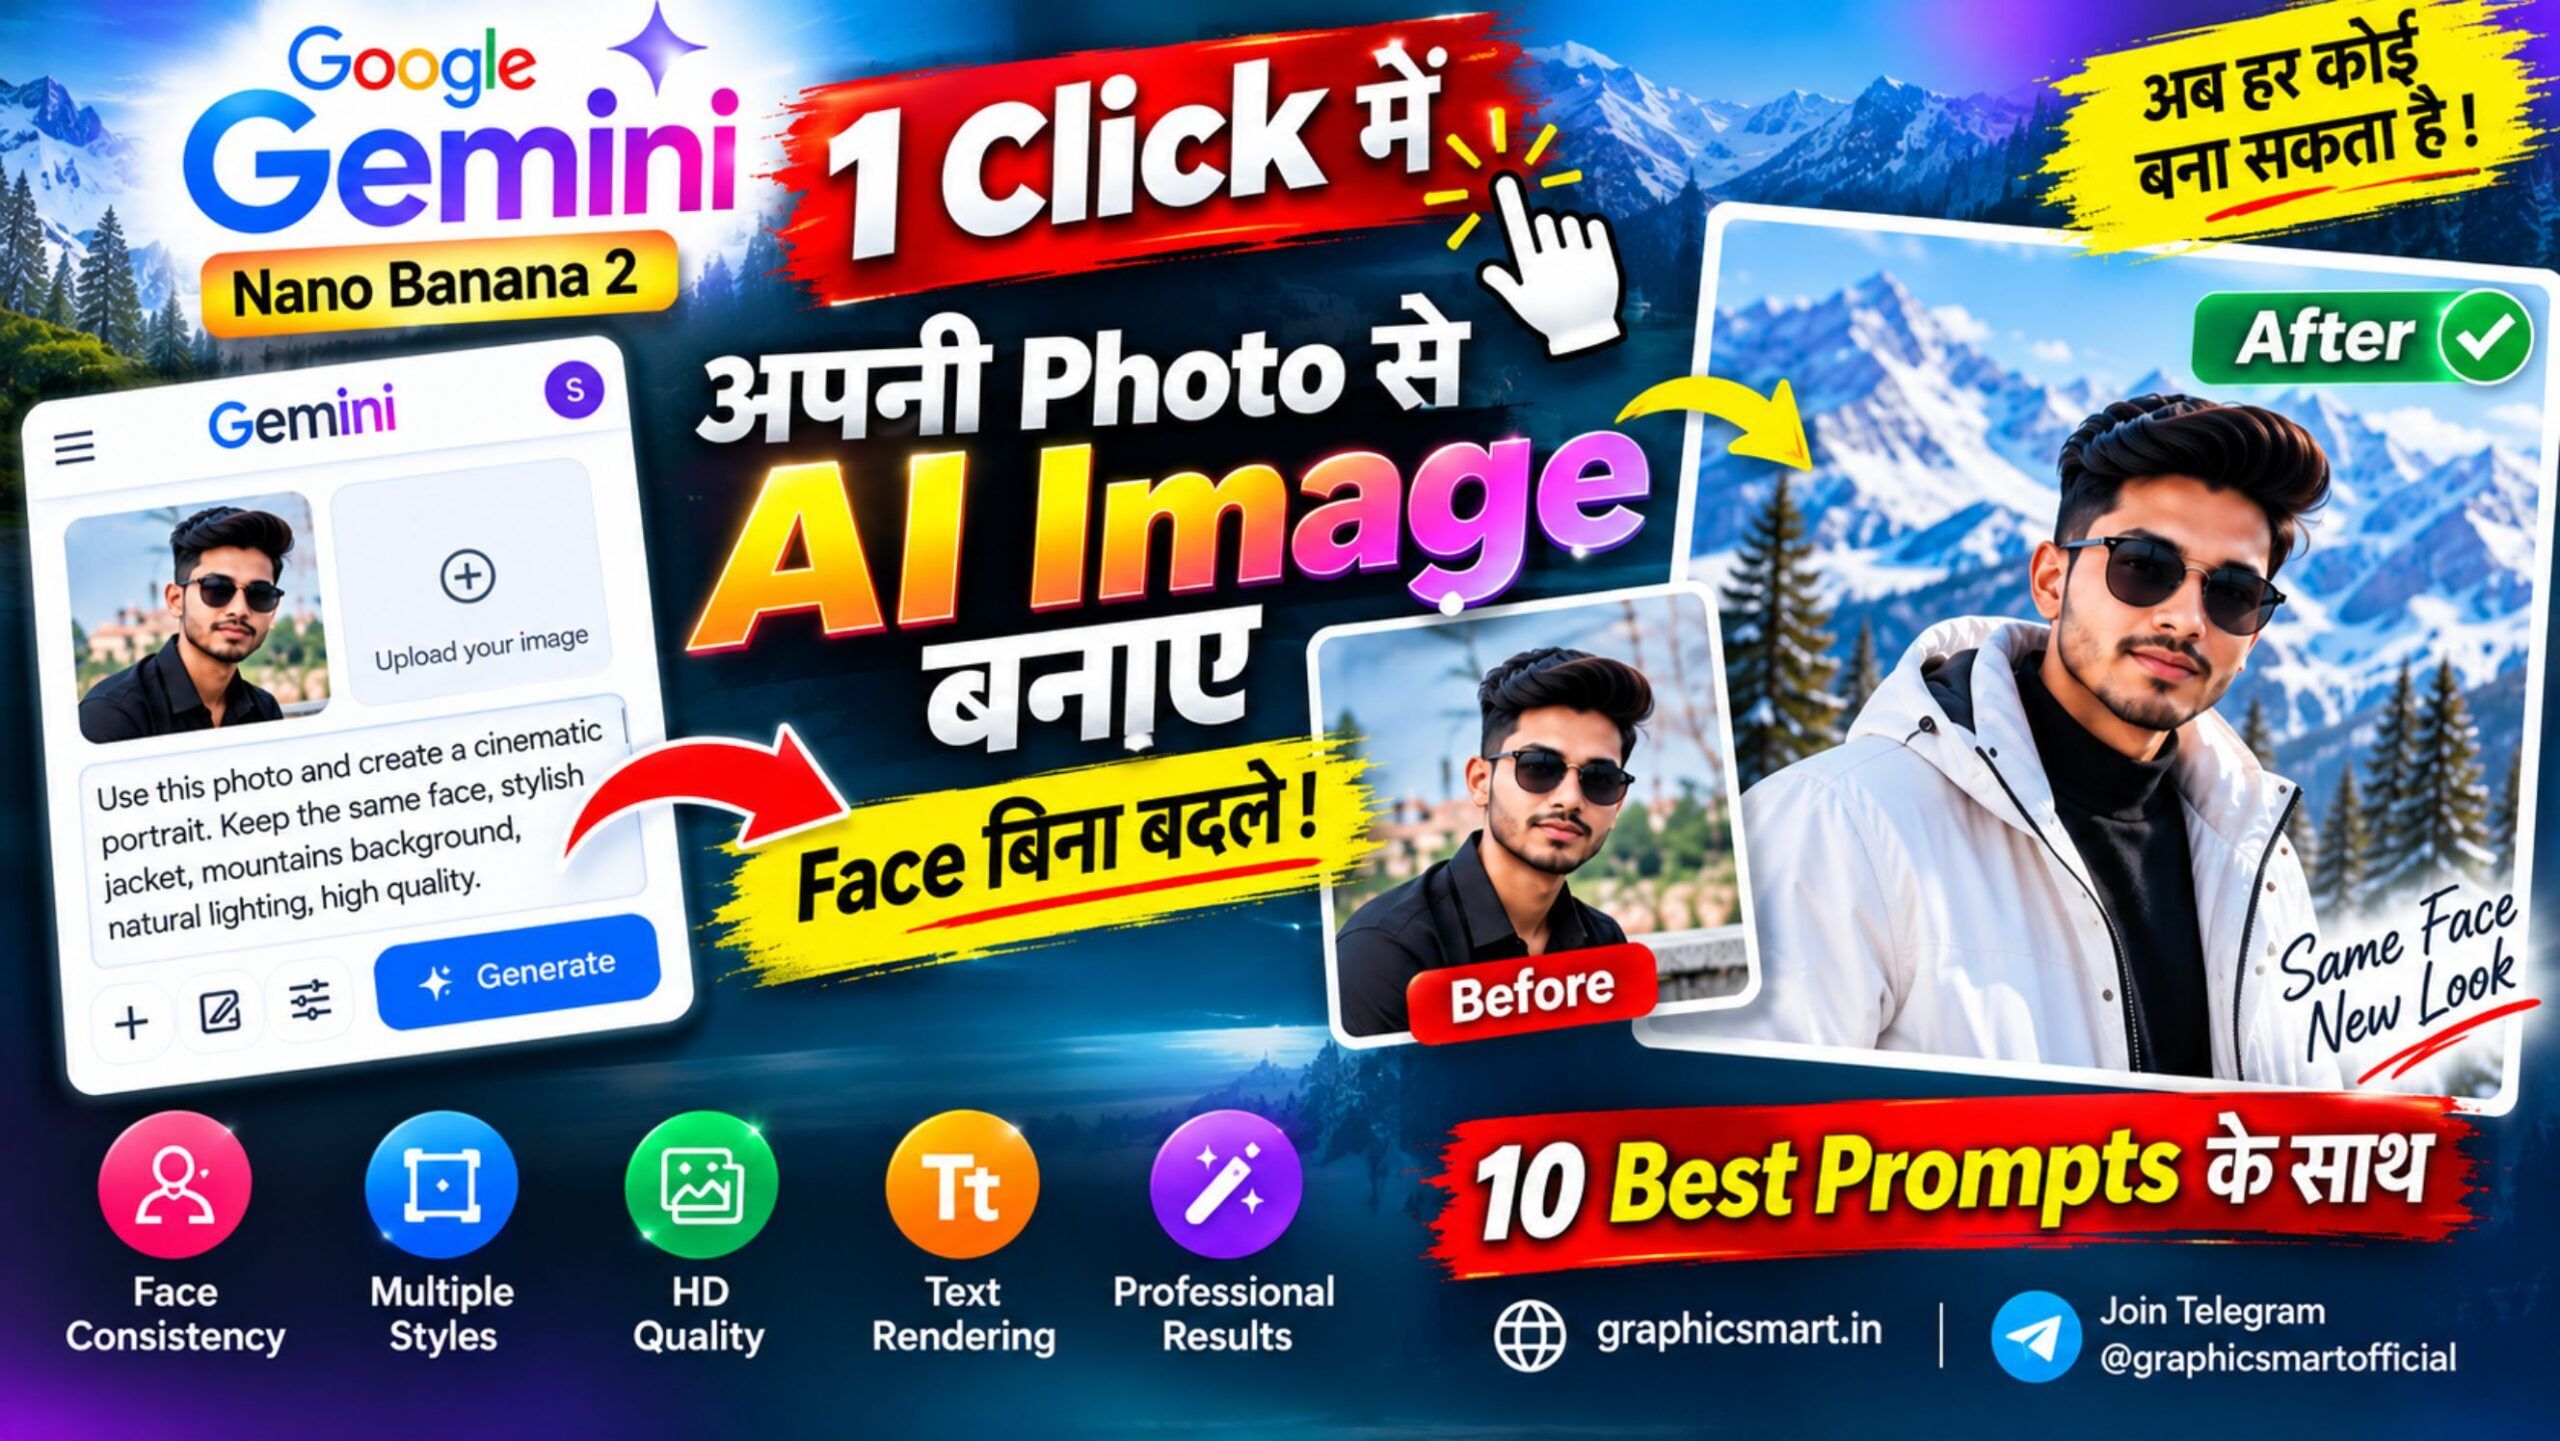
Nano Banana 2 से अपनी Photo का Face बिना बदले AI Image कैसे बनाएं? 10 Best Prompts के साथ
AI Photo Editing 2026 में काफी तेजी से बदल रही है। अब केवल Text लिखकर नई Image बनाने के साथ-साथ अपनी खुद की Photo Upload करके उसका Background, Dress, Lighting और पूरा Environment भी बदला जा सकता है।
Google का Nano Banana 2 इसी तरह का नया AI Image Generation और Editing Model है, जिसका इस्तेमाल Gemini Apps में Image बनाने और Edit करने के लिए किया जा सकता है।
इसकी खास बात यह है कि Google ने इसमें Character Consistency, Local Editing, Better Text Rendering, Multiple Reference Images और बेहतर Instruction Following जैसी क्षमताओं पर काम किया है।
अगर आप अपनी सामान्य Photo को Professional, Cinematic, Nature, Royal या दूसरे Creative Look में बदलना चाहते हैं, तो Nano Banana 2 आपके लिए उपयोगी हो सकता है।
इस Article में हम Step-by-Step जानेंगे कि Nano Banana 2 से AI Photo कैसे बनाएं, अपनी Photo Upload करके Face को ज्यादा Consistent कैसे रखें और बेहतर Result के लिए Prompt कैसे लिखें।
अंत में आपको 10 Ready-to-Use AI Photo Prompts भी मिलेंगे जिन्हें आप अपनी जरूरत के अनुसार Customize कर सकते हैं।
Nano Banana 2 क्या है?
Nano Banana 2 Google का AI Image Generation और Editing Model है।
यह Gemini Apps में Images Generate और Edit करने के लिए इस्तेमाल किया जाता है।
इसके जरिए आप केवल Text Prompt से नई Image Generate कर सकते हैं या अपनी Existing Photo Upload करके उसमें बदलाव करने के लिए Gemini को निर्देश दे सकते हैं।
उदाहरण के लिए आप अपनी Photo Upload करके लिख सकते हैं कि Background को बदलना है, Outfit को Professional बनाना है या पूरी Photo को Cinematic Environment में दिखाना है।
Nano Banana 2 की एक महत्वपूर्ण क्षमता Character Consistency है, जिसका उद्देश्य अलग-अलग Generated Images में किसी व्यक्ति या Character के Look को अधिक Consistent बनाए रखना है।
Nano Banana 2 की खास Features क्या हैं?
Nano Banana 2 केवल सामान्य Text-to-Image Generator नहीं है। इसमें कई ऐसी Features हैं जो Photo Editing और Graphics Creation में उपयोगी हो सकती हैं।
1. Character Consistency
अगर आप किसी व्यक्ति की Reference Photo इस्तेमाल कर रहे हैं तो Nano Banana 2 अलग-अलग Generated Images में उसके Look को अधिक Consistent रखने के लिए बनाया गया है।
हालाँकि AI Generation में 100% Face Match की Guarantee नहीं होती। इसलिए Final Image को हमेशा ध्यान से Check करें।
2. Local Image Editing
अगर पूरी Image बदलने के बजाय केवल किसी खास हिस्से में बदलाव करना है तो Local Editing उपयोगी हो सकती है।
उदाहरण के लिए किसी Object, Background या Image के Specific Area में बदलाव मांगा जा सकता है।
3. Multiple Reference Images
Nano Banana 2 Multiple Reference Images को स्वीकार कर सकता है।
इसका इस्तेमाल अलग-अलग Visual Ideas या References को एक Generation में शामिल करने के लिए किया जा सकता है।
4. Better Text Rendering
AI Images में Text की गलत Spelling लंबे समय से एक समस्या रही है।
Nano Banana 2 में Text Rendering को बेहतर किया गया है, जिससे Supported Languages में Images के अंदर Text को अधिक सही तरीके से Generate करने की कोशिश की जाती है।
फिर भी किसी Poster, Advertisement या Business Design को Publish करने से पहले Text और Spelling खुद जरूर Check करें।
5. High Quality Output
Nano Banana 2 High Resolution Preview प्रदान करता है।
Available Plan के आधार पर Image Download Resolution अलग हो सकती है। इसलिए आपके Account में उपलब्ध Resolution Option को Export करते समय Check करें।
Nano Banana 2 से अपनी Photo कैसे बनाएं?
अब इसे Step-by-Step समझते हैं।
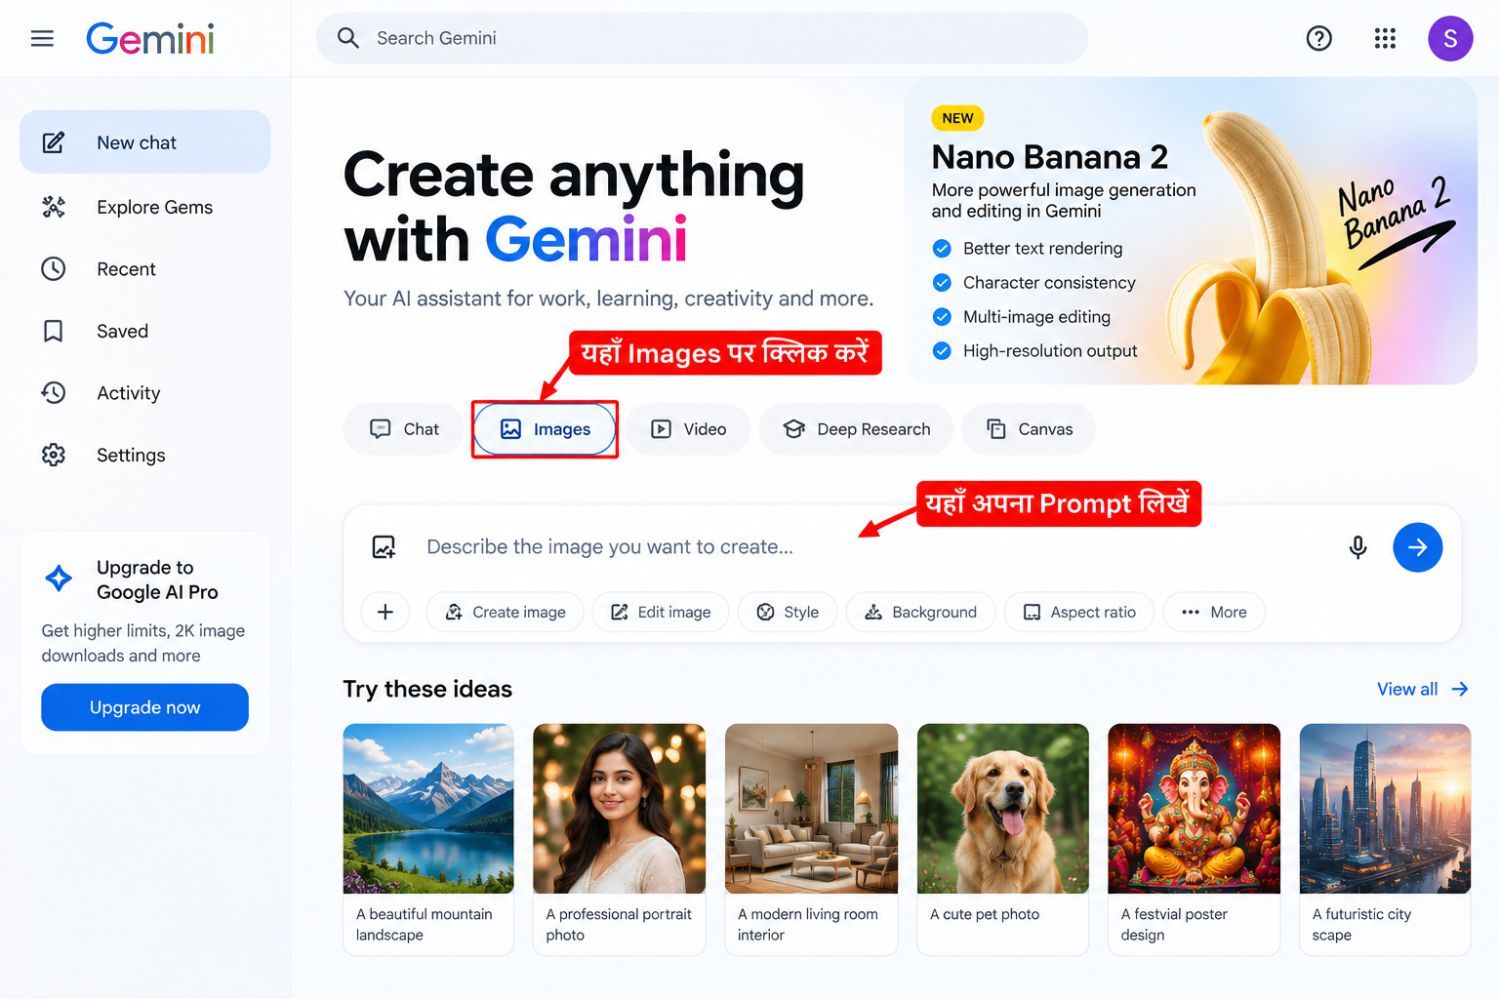
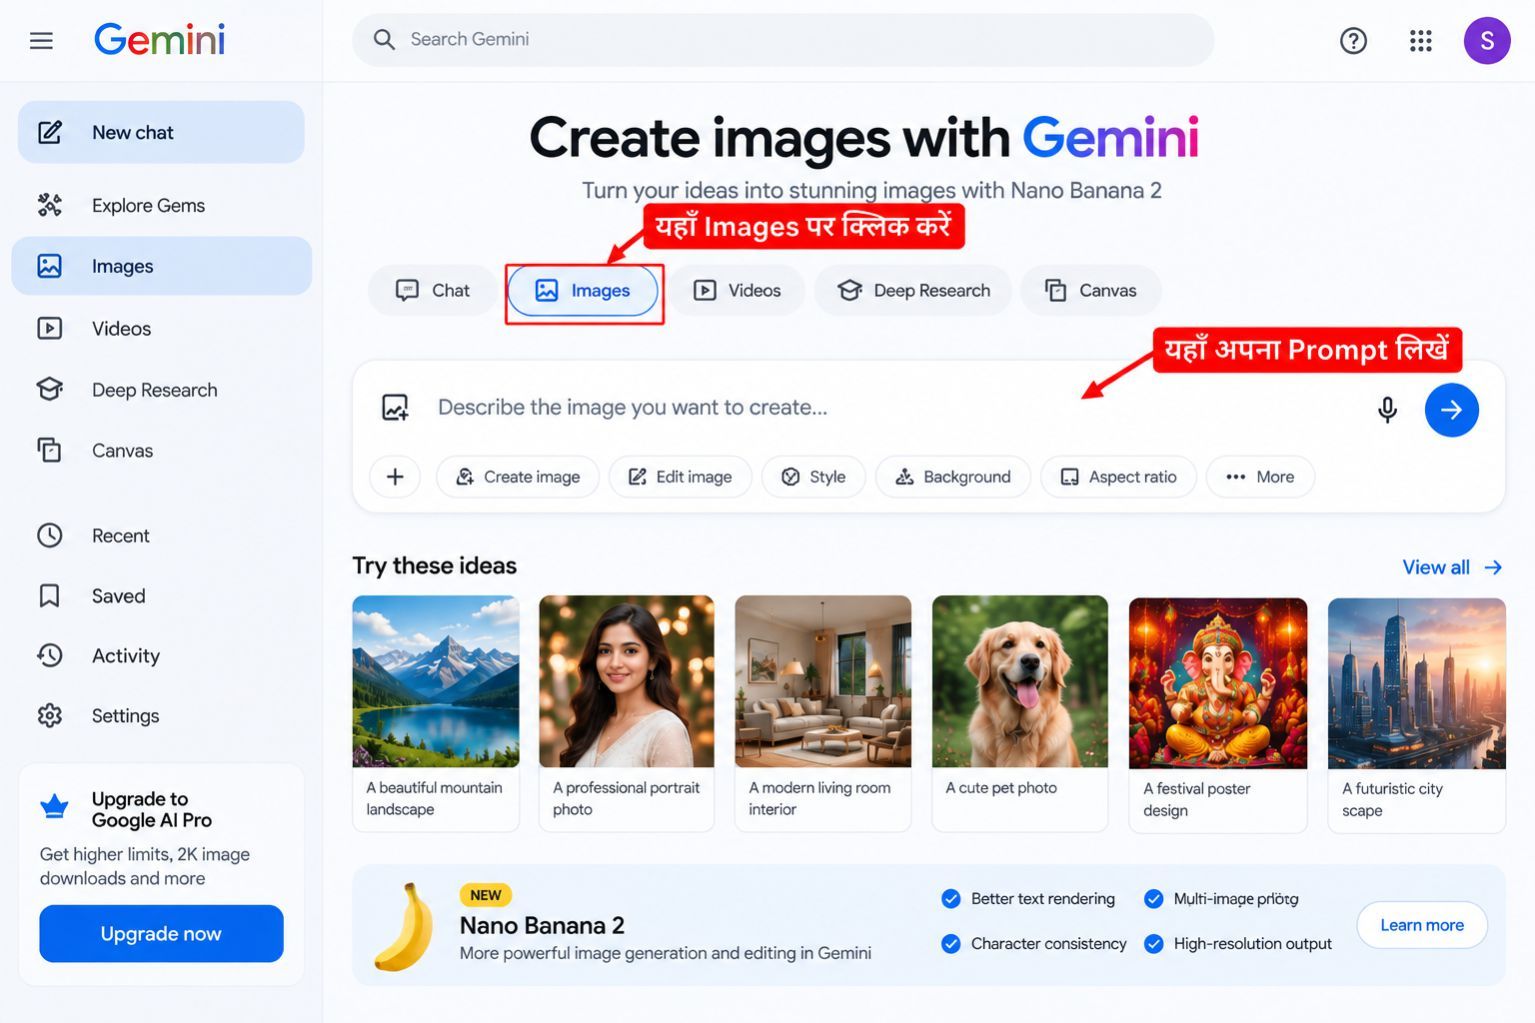
Step 1: Gemini Open करें
सबसे पहले Gemini App या Gemini Website खोलें और अपने Google Account से Sign In करें।
इसके बाद Images से संबंधित Option पर जाएँ।
Feature की Availability आपके Account, Country, Language और Age Requirements के अनुसार अलग हो सकती है।
Step 2: अपनी साफ Photo चुनें
अगर आप अपनी Photo का AI Version बनाना चाहते हैं तो अच्छी Quality वाली Reference Photo चुनना बहुत जरूरी है।
ऐसी Photo चुनें जिसमें:
चेहरा साफ दिखाई दे।
Photo बहुत ज्यादा Blur न हो।
Face पर बहुत ज्यादा Filter न लगा हो।
आँखें और Facial Features साफ दिखाई दें।
बहुत ज्यादा Dark Photo न हो।
अगर Reference Photo ही खराब होगी तो AI के लिए आपके Facial Features को सही तरीके से समझना मुश्किल हो सकता है।
Step 3: अपनी Photo Upload करें
अब Gemini में अपनी Photo Upload करें।
Photo Upload करने के बाद तुरंत सिर्फ “इसका अच्छा फोटो बनाओ” लिखने के बजाय Detailed Prompt देना बेहतर है।
AI को साफ बताएं कि Photo में क्या बदलना है और क्या नहीं बदलना है।
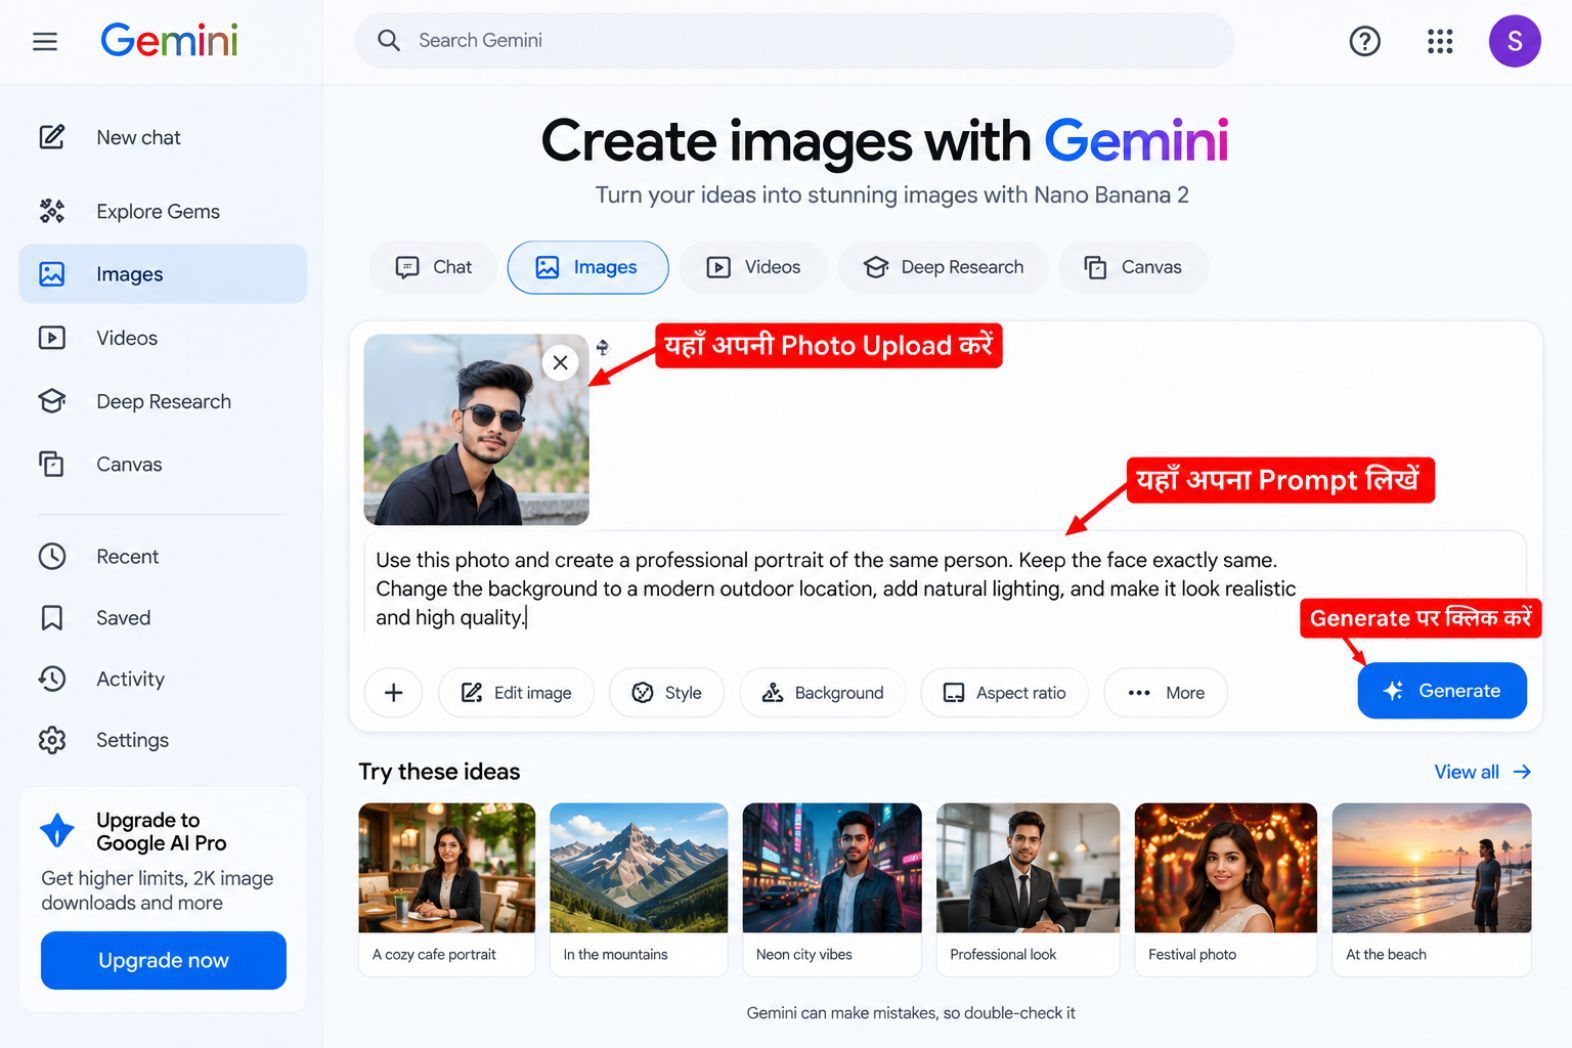
Face Consistency के लिए Prompt कैसे लिखें?
AI Image Editing में सबसे ज्यादा शिकायत यही होती है कि Generated Photo में व्यक्ति का चेहरा बदल गया।
इसके लिए Prompt में Reference Identity और Natural Facial Features को स्पष्ट रूप से Preserve करने के लिए कहना उपयोगी हो सकता है।
उदाहरण:
“Use the uploaded photo as the primary identity reference. Preserve the person’s recognizable facial features, natural skin tone, hairstyle, approximate age and natural proportions. Change only the requested outfit, background and lighting. Keep the result photorealistic and natural.”
ध्यान रखें कि ऐसा Prompt Face Consistency को Encourage करता है, लेकिन किसी AI Tool से Exact 100% Identity Match की Guarantee नहीं मानी जानी चाहिए।
Step 4: अपना Prompt लिखें
अब आपको बताना है कि Final Photo कैसी चाहिए।
एक अच्छा Prompt केवल Subject नहीं बताता बल्कि पूरी Scene Describe करता है।
उदाहरण के लिए Prompt में ये चीजें बताई जा सकती हैं:
Subject: व्यक्ति कैसा दिखे।
Outfit: किस तरह के कपड़े हों।
Background: पीछे क्या दिखाई दे।
Lighting: Studio, Golden Hour, Neon या Natural Lighting।
Camera Look: Portrait, DSLR Style या Cinematic Look।
Composition: Close-up, Half Body या Full Body।
Identity Instructions: Reference Photo के Facial Features Preserve करने की Request।
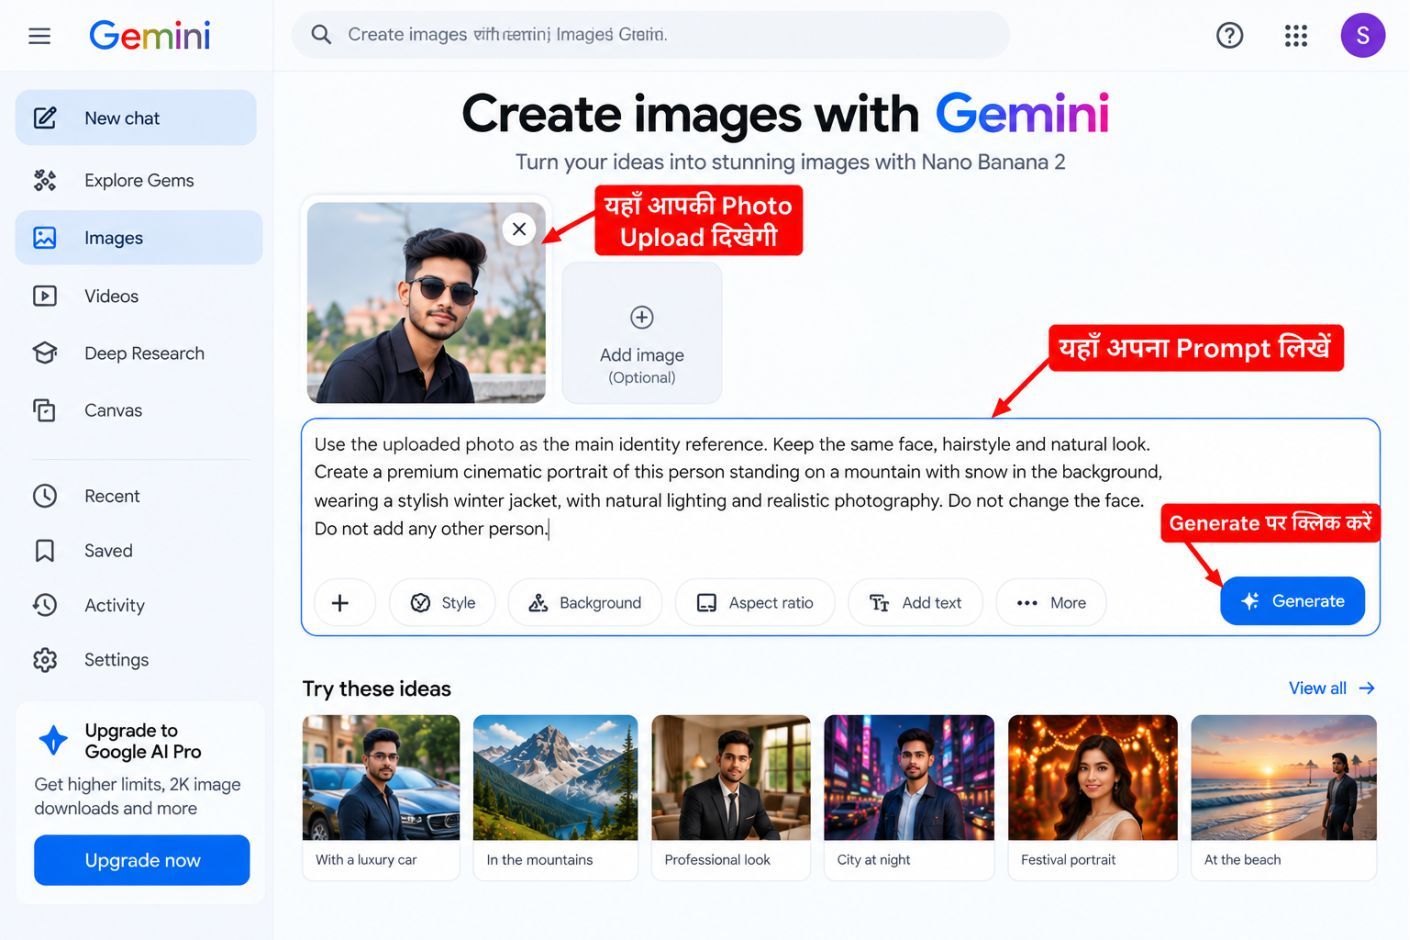
Step 5: Generated Photo को ध्यान से Check करें
Image Generate होने के बाद केवल यह न देखें कि Background अच्छा है या नहीं।
सबसे पहले Face Check करें।
Eyes देखें।
Nose और Face Shape देखें।
Hairstyle Check करें।
Hands और Fingers देखें।
Clothing में कोई अनचाहा बदलाव तो नहीं है, यह देखें।
Background में अनचाहे लोग या Objects तो नहीं आए हैं, यह भी Check करें।
अगर Result सही नहीं है तो Prompt को थोड़ा Modify करके दोबारा कोशिश करें।
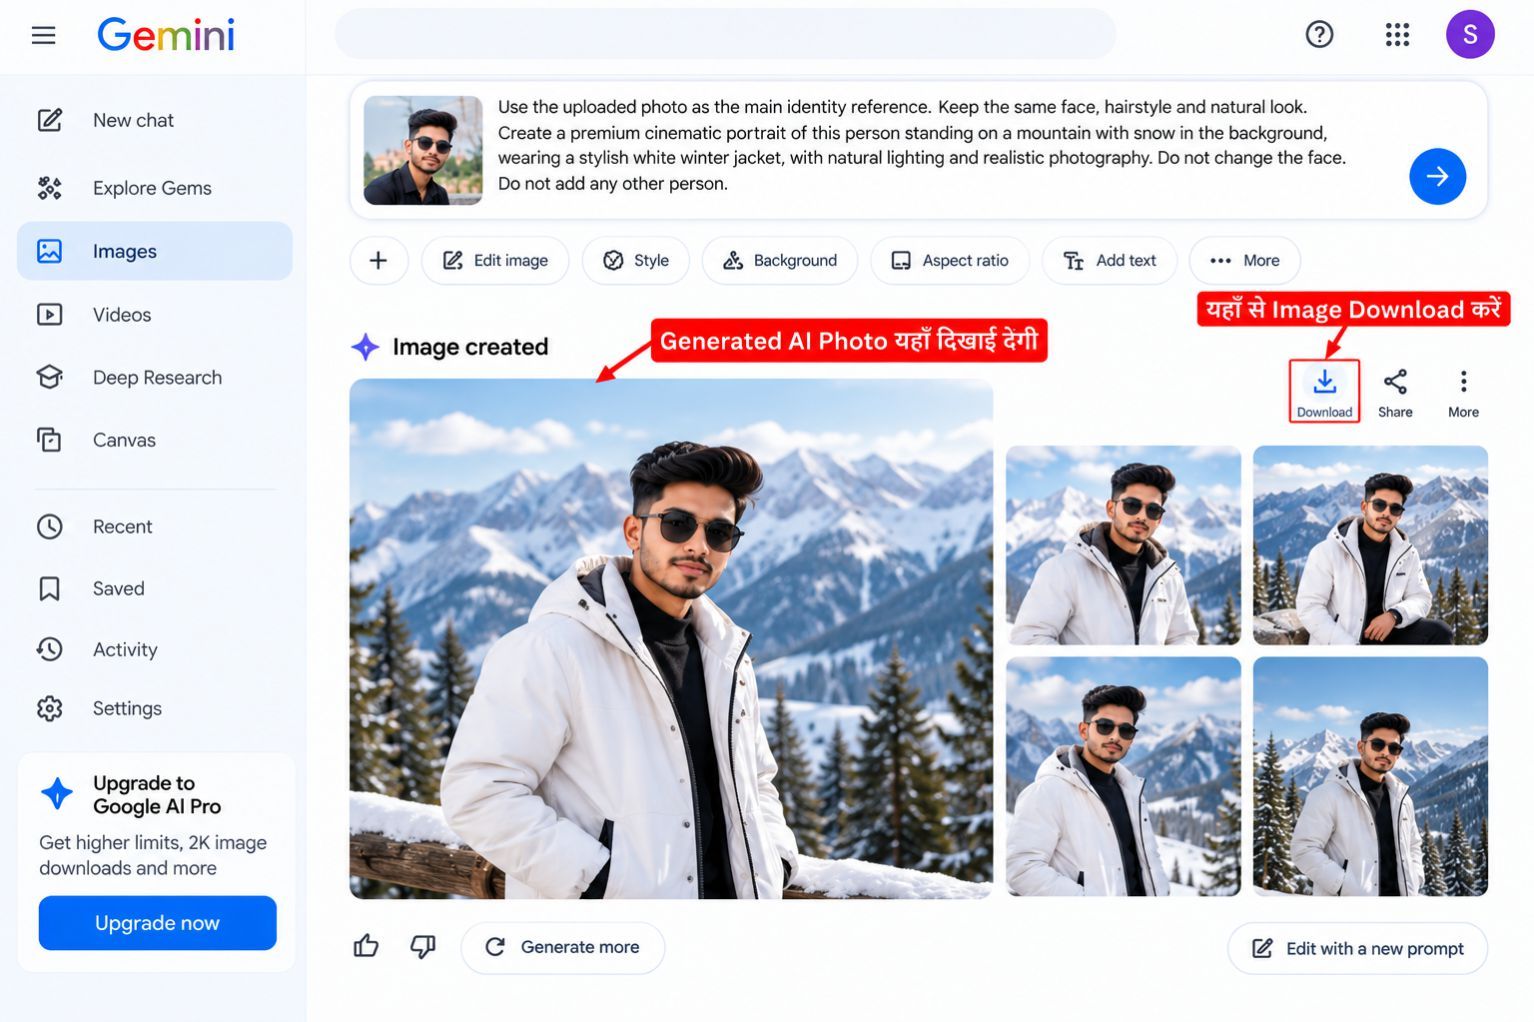
Step 6: पूरी Photo दोबारा बनाने के बजाय Local Edit करें
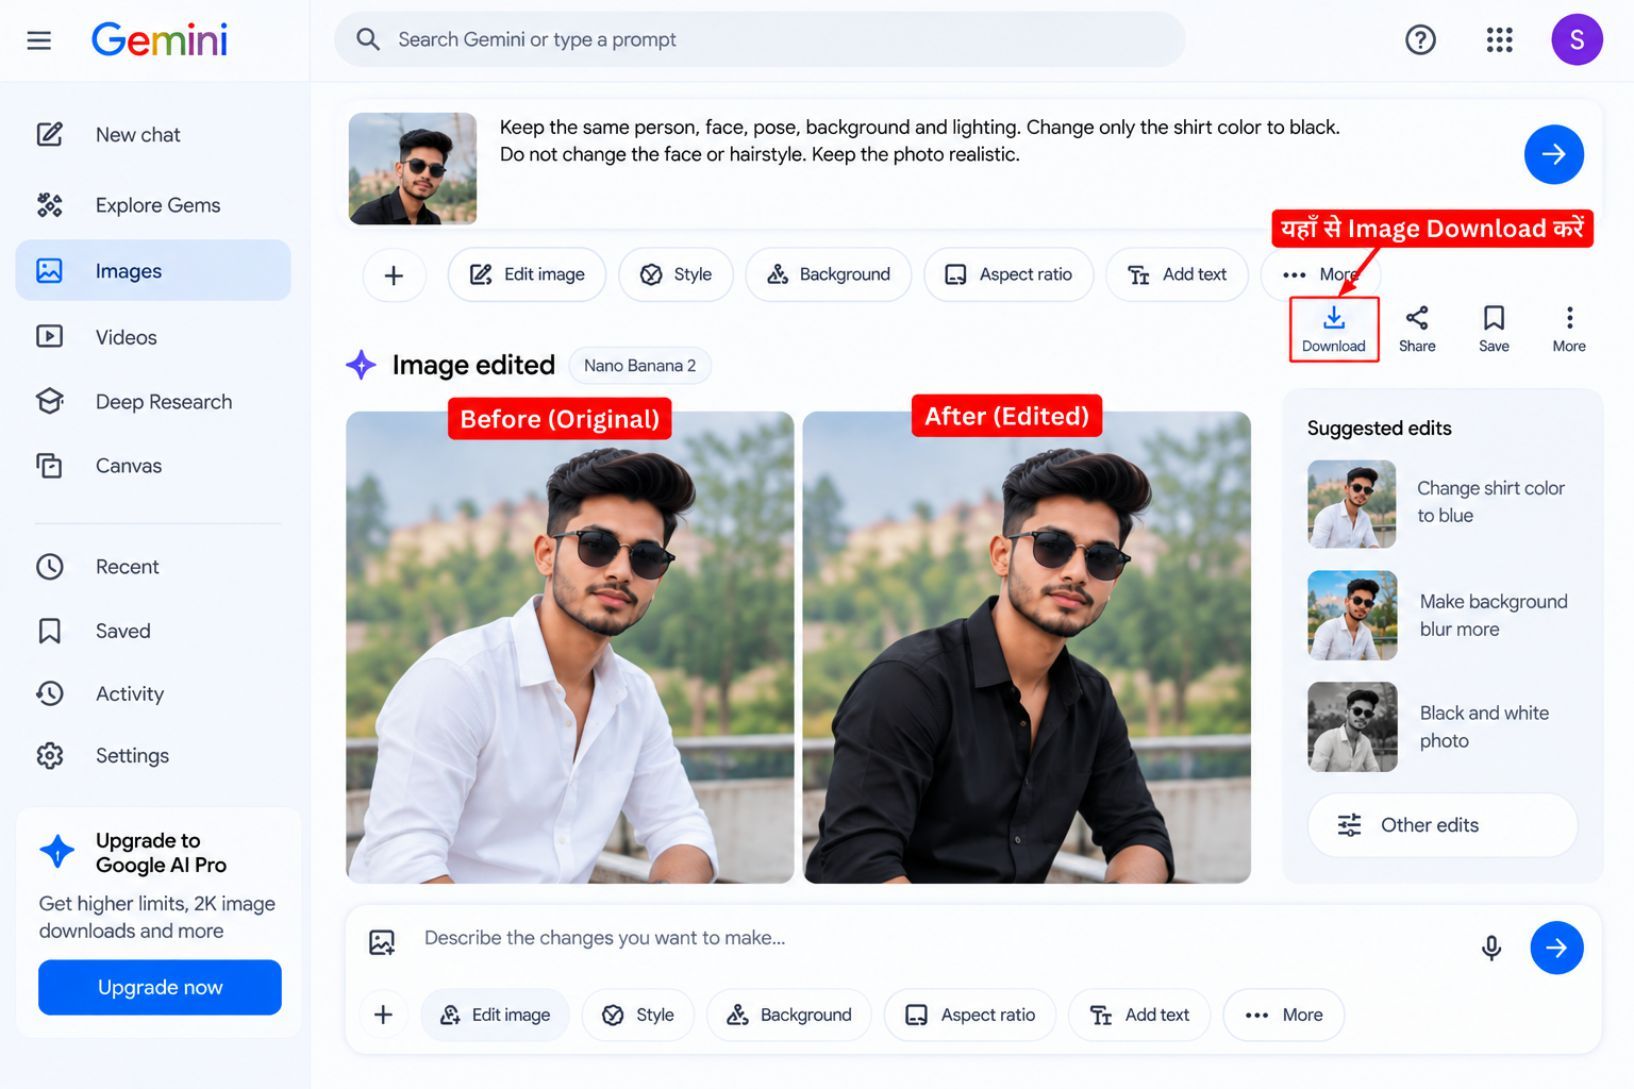
मान लीजिए Generated Image आपको पसंद आ गई लेकिन Shirt का Color गलत है।
ऐसी स्थिति में पूरी Image को शुरुआत से Generate करने के बजाय Specific Change के लिए Edit Prompt दिया जा सकता है।
उदाहरण:
“Keep the person, face, pose, background and lighting unchanged. Change only the shirt color to black.”
इसी तरह Background के किसी हिस्से या दूसरे Element में Targeted Change मांगा जा सकता है।
यह Workflow बार-बार पूरी Image Generate करने की तुलना में ज्यादा सुविधाजनक हो सकता है।
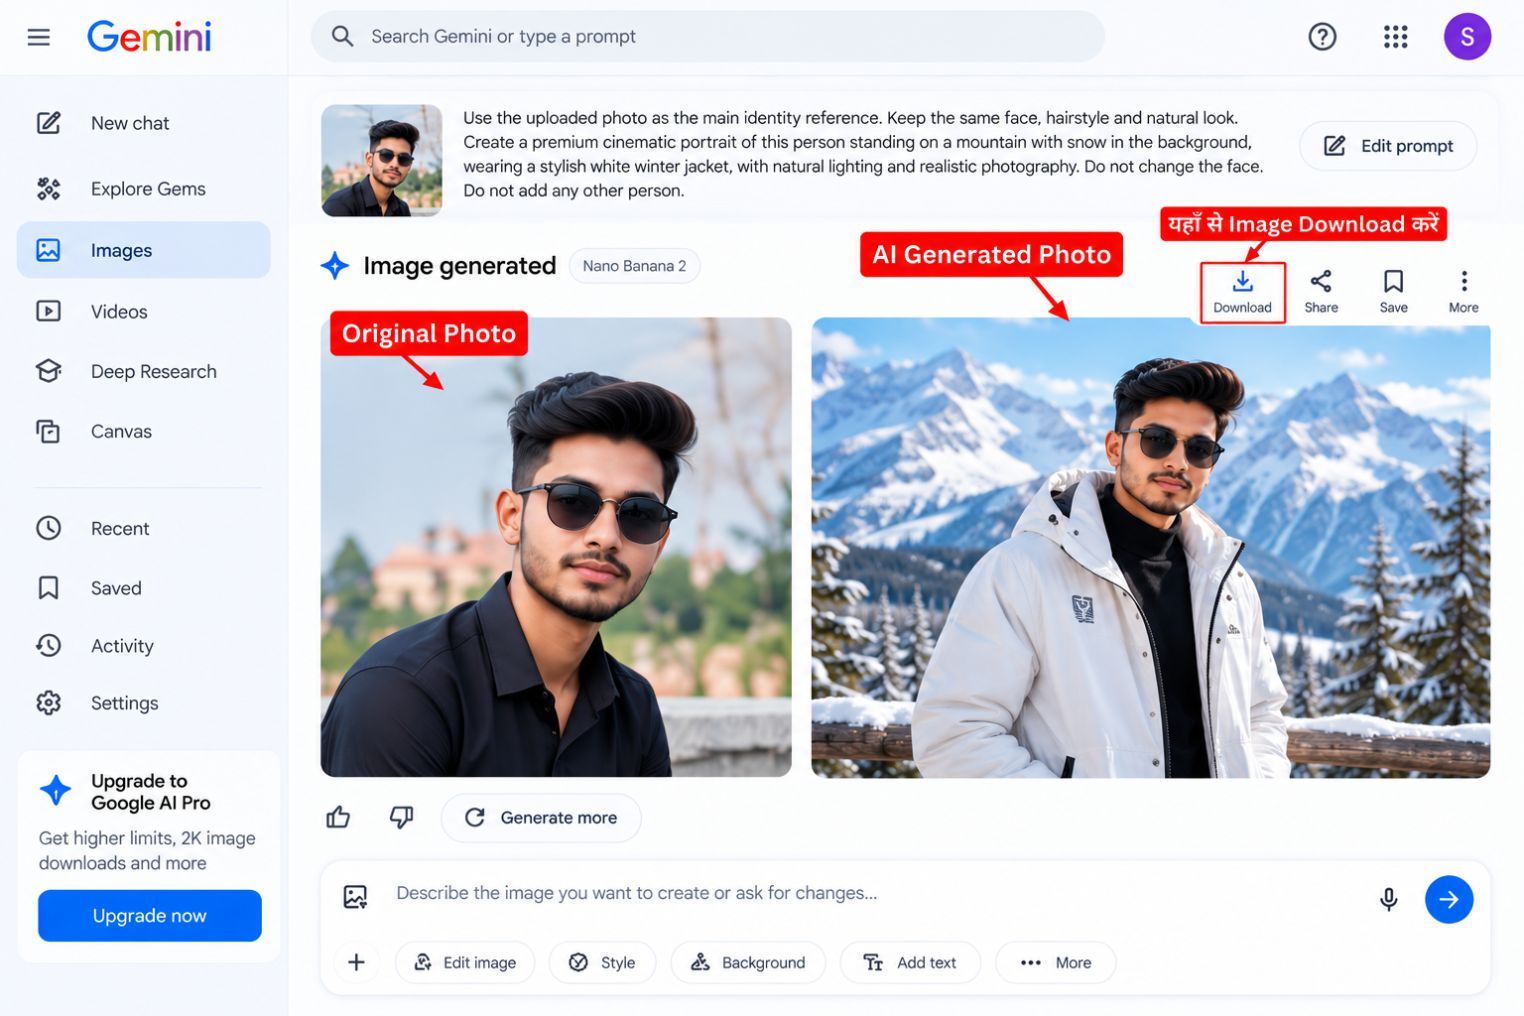
Nano Banana 2 के लिए 10 Ready-to-Use AI Photo Prompts
अब नीचे 10 Prompts दिए गए हैं जिन्हें अपनी Photo Upload करने के बाद इस्तेमाल किया जा सकता है।
जरूरत के अनुसार Outfit, Color, Location और Style बदल सकते हैं।
Prompt 1 – Professional Studio Portrait
Create an ultra-realistic professional studio portrait using the uploaded person as the primary identity reference. Preserve the recognizable facial features, natural skin tone, hairstyle, approximate age and natural body proportions. Dress the subject in an elegant professional outfit. Use a clean premium studio background, soft cinematic lighting, realistic skin texture, natural shadows and DSLR-style portrait photography. Do not add extra people. Keep the result realistic and professional.
Prompt 2 – Royal Indian Portrait
Create a premium royal Indian portrait using the uploaded photo as the main identity reference. Preserve the person’s recognizable face, natural complexion, hairstyle and body proportions. Dress the subject in an elegant royal Indian outfit with tasteful detailing. Place the subject inside a luxurious Indian palace with warm golden lighting, detailed architecture and cinematic depth. Keep the face natural and photorealistic. Generate only one person.
Prompt 3 – Nature Cinematic Portrait
Create a beautiful cinematic nature portrait using the uploaded person’s identity as reference. Preserve recognizable facial features, natural skin tone, hairstyle and age. Place the person in a breathtaking green mountain valley with soft morning sunlight, light mist and realistic natural scenery. Use premium outdoor photography, shallow depth of field and natural skin texture. Keep exactly one person in the scene.
Prompt 4 – Luxury Car Portrait
Create an ultra-realistic luxury lifestyle portrait using the uploaded photo as the identity reference. Preserve the person’s recognizable facial features and natural appearance. Place the subject beside a premium luxury car in a modern city environment during golden hour. Use cinematic commercial photography, realistic reflections, premium outfit styling and natural lighting. Do not add any extra people.
Prompt 5 – Futuristic Neon Portrait
Create a cinematic futuristic portrait using the uploaded person as the primary identity reference. Preserve the recognizable face, natural skin tone, hairstyle and body proportions. Place the person inside a futuristic neon-lit city at night with blue and violet lights, realistic wet-road reflections and subtle atmospheric mist. Use professional cinematic lighting while keeping the face natural and clearly visible. Generate exactly one person.
Prompt 6 – Traditional Indian Festival Portrait
Create a premium traditional Indian festival portrait from the uploaded photo. Preserve the person’s recognizable facial features, natural complexion, hairstyle and age. Dress the subject in an elegant traditional Indian outfit. Create a beautiful festive environment with tasteful lights, flowers and decorative elements. Use warm cinematic lighting and realistic photography. Do not overcrowd the background and do not add extra people.
Prompt 7 – Monsoon Rain Portrait
Create an ultra-realistic cinematic monsoon portrait using the uploaded person as the identity reference. Preserve recognizable facial features, natural skin tone, hairstyle and body proportions. Place the subject on a beautiful city street during gentle rain with realistic wet-ground reflections and soft background lights. Use natural rain droplets, cinematic lighting and professional photography. Keep the face clearly visible and natural.
Prompt 8 – Premium Business Portrait
Create a sophisticated business portrait using the uploaded photo as the primary identity reference. Preserve the person’s recognizable facial features, hairstyle, natural skin tone and age. Dress the subject in premium formal clothing and place them inside a modern luxury office with subtle glass architecture and professional lighting. Use realistic corporate photography, clean composition and natural skin texture.
Prompt 9 – Himalayan Travel Portrait
Create a breathtaking realistic Himalayan travel portrait using the uploaded person’s identity as reference. Preserve the recognizable face, hairstyle, natural complexion and body proportions. Place the subject at a beautiful mountain viewpoint surrounded by snow-covered peaks and dramatic natural scenery. Use realistic daylight, professional travel photography and cinematic depth. Generate only one person.
Prompt 10 – Creative Double Exposure Portrait
Create an artistic double-exposure portrait using the uploaded person as the primary identity reference. Preserve the recognizable facial structure and natural appearance. Keep the main portrait clear while blending a beautiful futuristic city and natural landscape subtly inside the silhouette. Use cinematic lighting, premium editorial photography and balanced composition. Do not create a second human face or duplicate the subject.
बेहतर AI Photo पाने के लिए 7 जरूरी Tips
पहली कोशिश में Perfect Result न मिलने पर तुरंत Tool को खराब न मानें।
AI Image Generation में Prompt और Reference Photo दोनों का बहुत बड़ा Role होता है।
1. High Quality Reference Photo इस्तेमाल करें।
2. Prompt में केवल जरूरी Details लिखें।
3. Face को Natural रखने के लिए स्पष्ट Instructions दें।
4. एक Prompt में बहुत ज्यादा अलग-अलग Concepts न भरें।
5. Background और Outfit साफ-साफ Describe करें।
6. Generated Result में Hands, Face और Text जरूर Check करें।
7. अगर केवल एक छोटी चीज गलत है तो पूरी Image बदलने के बजाय Local Edit Try करें।
Nano Banana 2 में Multiple Photos का इस्तेमाल
Nano Banana 2 Multiple Reference Images स्वीकार कर सकता है।
इसका फायदा Creative Composition बनाते समय हो सकता है।
उदाहरण के लिए आपके पास एक Subject Photo और दूसरी Style/Scene Reference हो सकती है।
लेकिन Multiple Photos इस्तेमाल करते समय Prompt में साफ बताना जरूरी है कि कौन-सी Photo किस Purpose के लिए है।
AI को अस्पष्ट Instructions देने पर Result आपकी उम्मीद से अलग हो सकता है।
क्या Nano Banana 2 Free है?
Nano Banana 2 की Availability और Output Options आपके Gemini Access और Google AI Plan पर निर्भर कर सकते हैं।
Google की मौजूदा Help Information के अनुसार Nano Banana 2 के साथ High-resolution preview उपलब्ध है। बिना Google AI Plan के 1K और Google AI Plan के साथ 2K Image Download उपलब्ध हो सकता है।
Google समय के साथ Plans, Limits और Features बदल सकता है, इसलिए अपने Account में दिखाई देने वाली Current Information को जरूर Check करें।
Nano Banana 2 और Nano Banana Pro में क्या अंतर है?
Nano Banana Family में अलग-अलग Models अलग जरूरतों के लिए उपलब्ध हो सकते हैं।
Nano Banana 2 Speed और Image Quality के बीच Balance प्रदान करता है और Multiple Reference Images को स्वीकार कर सकता है।
वहीं Eligible Paid Subscribers के लिए Nano Banana Pro से Image को Redo करने का विकल्प उपलब्ध हो सकता है। Pro अधिक Detail, Advanced Text/Language Capability, Consistency और Creative Control के लिए बनाया गया है।
हर User को एक जैसे Options दिखाई दें, यह जरूरी नहीं है।
AI Photo बनाते समय Privacy का ध्यान रखें
अपनी Personal Photos किसी भी Online AI Service पर Upload करने से पहले उसकी Privacy और Terms को समझना अच्छा Practice है।
ऐसी Photos Upload करने से बचें जिनमें Sensitive Personal Documents, Bank Details, Password, Aadhaar Number या दूसरी निजी जानकारी दिखाई दे रही हो।
किसी दूसरे व्यक्ति की Photo इस्तेमाल करते समय भी उसकी Privacy और Permission का ध्यान रखें।
AI Image को Commercial काम में इस्तेमाल करने से पहले क्या करें?
अगर आप AI Generated Image को Client Work, Advertisement, Website या किसी दूसरे Commercial Purpose में इस्तेमाल करना चाहते हैं तो संबंधित Service की Current Terms जरूर Check करें।
दूसरे लोगों के Copyright, Trademark और Privacy Rights का सम्मान करें।
किसी Famous Brand का Logo या Copyrighted Character बिना जरूरत Copy करने से बचें।
Client के लिए Final Design देने से पहले AI Generated Image को खुद Review करना भी जरूरी है।
क्या Graphics Designers के लिए Nano Banana 2 उपयोगी है?
Graphics Designers के लिए AI Image Generation काफी उपयोगी Assistant बन सकती है।
उदाहरण के लिए Designer AI से:
Creative Background तैयार कर सकता है।
Poster के लिए Concept बना सकता है।
Product Visualization कर सकता है।
Photo का Environment बदल सकता है।
Client को अलग-अलग Creative Options दिखा सकता है।
फिर Final Typography, Logo Placement, Color Correction और Print Setup CorelDRAW, Photoshop या दूसरे Professional Designing Software में किया जा सकता है।
इस तरह AI और Traditional Designing दोनों को साथ इस्तेमाल किया जा सकता है।
Frequently Asked Questions (FAQ)
Nano Banana 2 क्या है?
Nano Banana 2 Google का AI Image Generation और Editing Model है, जिसका इस्तेमाल Gemini Apps में Images Generate और Edit करने के लिए किया जा सकता है।
क्या Nano Banana 2 से अपनी Photo Edit कर सकते हैं?
हाँ। Gemini में अपनी Image Upload करके उसमें बदलाव करने के लिए Prompt दिया जा सकता है।
क्या Nano Banana 2 Face को बिल्कुल Same रखता है?
इसमें Character Consistency की क्षमता है, लेकिन किसी भी AI-generated result में 100% exact facial match की Guarantee नहीं माननी चाहिए। अच्छी Reference Photo और Clear Prompt बेहतर Result में मदद कर सकते हैं।
क्या Nano Banana 2 Multiple Photos इस्तेमाल कर सकता है?
हाँ, Nano Banana 2 Multiple Reference Images स्वीकार कर सकता है।
क्या Nano Banana 2 Image के एक हिस्से को Edit कर सकता है?
हाँ, इसमें Local Editing की क्षमता है जिससे Specific Changes किए जा सकते हैं।
क्या Nano Banana 2 Text वाली Images बना सकता है?
इसमें Text Rendering को बेहतर किया गया है। फिर भी Final Image में Names, Numbers और Spelling को Manually Verify करना जरूरी है।
Nano Banana 2 से किस तरह की Photos बनाई जा सकती हैं?
Professional Portrait, Nature Photo, Cinematic Portrait, Festival Image, Business Portrait, Creative Artwork और कई दूसरे प्रकार के Visuals बनाए जा सकते हैं।
Conclusion
Nano Banana 2 AI Photo Generation और Editing को पहले से ज्यादा Flexible बनाने वाला एक उपयोगी Tool है।
इसकी Character Consistency, Multiple Reference Images, Local Editing, Improved Text Rendering और बेहतर Instruction Following जैसी क्षमताएँ Personal Photo Editing के साथ-साथ Graphics Designing में भी काम आ सकती हैं।
लेकिन सबसे अच्छा Result पाने के लिए केवल AI पर निर्भर रहने के बजाय अच्छी Reference Photo, Clear Prompt और Final Manual Review जरूरी है।
अगर आपकी Generated Photo में Face थोड़ा बदल जाता है तो Prompt को Improve करें और AI को साफ बताएं कि Uploaded Photo को Primary Identity Reference की तरह इस्तेमाल करना है।
ऊपर दिए गए 10 Prompts को अपनी Photo के साथ अलग-अलग Style में Try किया जा सकता है।
AI Tools तेजी से बदल रहे हैं, इसलिए नए Features सीखते रहने के साथ-साथ अपनी Designing Skill, Creativity और Final Quality Check पर भी ध्यान देना सबसे जरूरी है।
